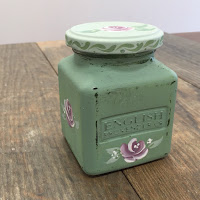
For many people discovering a new hobby can be exciting and addictive. Once we delve into learning a new skill, our confidence grows and soon, all we want to do is create. It is often the same with our Folk It kits. When I discovered Folk Art in Australia, I would drop my children off at school and take up residence in my teachers studio to take part in back to back lessons, only leaving when I needed to pick them back up again. There comes a time when paper is not enough and we want to use our brushstrokes on anything that doesn't move. We know that we are not alone in this feeling and a while back I created this tutorial for our newsletter subscribers. Following the Handmade Fair and our weekender on Create and Craft recently, we have started receiving questions about how to paint on glass. We visited our newsletter archives, gave it a tweak or three and posted it here for you to enjoy. I hope you find it useful.
Happy Folking,
Carol x
DecoArt understand the lure of painting on glass - to create beautiful glass tree ornaments, upcycle jam jars or create beautiful storage. They have done a fantastic job creating many different paints that allow you to paint straight onto different surfaces. If you wish to paint on glass, you can choose some lovely DecoArt Gloss Enamels. However, DecoArt Multi Surface Satin is a great all rounder for painting onto most surfaces.
However, the best paint for Folk Artists like us, is Americana Acrylics. They are a perfect consistency and dry to a beautiful matt finish. The problem with using these paints on their own and painting directly onto glass is that they can be very easily scratched off. However, the solution can be found in DecoArt's Paint Adhesion Medium or Multi Purpose Sealer.
You can either paint a thin layer of the medium directly onto surface you wish to paint as we have done here, or you can add it into your acrylics (1:1 - you will not lose quality in colour or consistency) and paint directly on to the plain glass.
You can either paint a thin layer of the medium directly onto surface you wish to paint as we have done here, or you can add it into your acrylics (1:1 - you will not lose quality in colour or consistency) and paint directly on to the plain glass.
Step 1: Choose your glass item you wish to paint. I chose an empty pickle jar - it doesn't have to cost a fortune to look pretty. This was a jar I had at home but I chose it for its lovely shape and detail - any raised detail will look lovely when you lightly sand some of the paint off.
Before you start to paint you need to ensure the surface is absolutely clean. While it is tempting to miss this step out, (especially if you're excited to get started) it really does ensure the best finish. Use a 1:1 solution of vinegar and water to wipe down your glass. We have a lot of natural oils on our fingers that can ruin our finished piece so be careful not to handle the glass after you have cleaned it.
The ultimate grease remover is pure alcohol called Isopropyl. It is worth investing in some if you wish to paint a lot of glass and can be bought from Pharmacies.
Step 2: Paint a layer of Paint Adhesion Medium onto your glass and allow it to dry completely.
(Please note: The Paint Adhesion medium has since been discontinued. However, DecoArt Multi Purpose sealer can be used in exactly the same way for the same purpose)
(Please note: The Paint Adhesion medium has since been discontinued. However, DecoArt Multi Purpose sealer can be used in exactly the same way for the same purpose)
Step 3: Paint one layer of your paint on top of the dried medium. For this project, I created this soft green by mixing Baby Blue and Hauser Light Green (both from the Series 1 Starter kit). Again, allow your paint to dry completely before the next step.
I am a big advocate for using leftover paint. DecoArt's Americana acrylics really do go a long way and so here, I also covered a Kenco Millicano coffee tub (shown in the background).
Step 4: (optional) With fine sandpaper, lightly rub over the jar to pick out any detail - like the words on these jars.
Step 5: Using your traced pattern and transfer paper, transfer your design guide onto your surface - don't forget all sides and any lids you may have!
 |
| Paint on your design |
Step 7: Sit back, admire and wait for your paint to cure.
All paint needs to cure. A cured paint will be solid throughout, not just dry to the touch. Acrylics often feel dry a few minutes after being painted but in order to cure, it usually needs a couple of weeks. Factors such as humidity, number of coats and thickness of paint will also influence this time. A slick surface will mean paint is easily scratched off after a couple of days but becomes more robust after a couple of weeks.
Always remember, your painted objects are like a car. Scratch a car with a key and paint will come away. Similarly, if your object is scratched with some force, because it does not have that 'key', some paint will be removed, regardless of the paint used.


No comments
Post a Comment