Monday 14 December 2015

How to... paint poinsettia's in 10 easy steps


Even though I've been painting for 20 years, I know that in my life time I won't learn everything there is to know about Folk Art & Decorative Painting. 

The ethos of You Can Folk It! is that in each series we will teach you a different set of skills and once you've completed lessons from each series (there will be 3 in total) you will have a the basic foundation of most skills. This is because just like cooking a recipe, most designs use a little bit of this and a little bit of that.  

Here I will be showing you how to paint this Poinsettia using skills that you've learnt in both Series No. 1 and Series No. 2. 


Step 1: To start with, print the pattern and start by transferring the leaves and petals marked 1 & 2. 

Start by painting the leaves using DecoArt's Americana Acrylic in Avocado

Step 2: Paint the leaves marked 1 using Avocado (from our series 2 paint palette) and the round brush. 

Using comma strokes, paint from the inside to the tip. (Note use your liner brush for the tip of the leaves if you are struggling to get a fine point). 

Once these are dry, use the white transfer to transfer petals marked 2 over the top of your design. 

                Basecoat the first layer of petals with white to prevent your paint looking transparent

Step 3: To paint the petals, because red is a transparent colour (any colour that does not have white added tends to be transparent) we need to paint the petals white first.

By adding red onto a layer of white, you get a beautiful solid colour.
Step 4: Once the white has dried, add a touch of soft black (part of our Series 2 paint palette) to tomato red and paint the petals again.

Paint the next layer of Poinsettia petals with DecoArt's Americana acrylic in warm white and then lamp red

Step 5: Again, once this layer has dried, transfer the petals labelled 3 and repeat these steps with just tomato red. 

Step 6: To paint the centre, add soft black to the tomato red until it is slightly darker than your first layer of petals. Fill the middle using your round brush. 

Float DecoArt's Soft black americana acrylic to create depth to your petals

Step 7: We now need to 'shade' any areas that are behind something else in order to create dimension. As this petal is behind one in front we are going to 'float' soft black to create the shade (I teach you how to use this technique on the DVD's contained in our Series No. 2 Babushka and Cupcake kit) 

A folk art poinsettia ready for the final details

Here I've used the transfer paper to re-transfer the lines so I know which petals are in front of the others. You can see where I have floated the soft black to create the shade.

Highlight the petals to create depth with DecoArt's Americana Acrylic in Cadmium orange

Step 8: Now, to create more depth, we need to highlight the petals that are at the front. I have floated a lighter colour (DecoArt's Americana Cadmium Orange) on the edges of the petals. I have also floated some colour on the very tips of the petals that are behind.  

TIP: One of the most common mistakes to make when creating a highlight using floated colour is to use colours that contain a lot of white. Doing this only works if the colour you are highlighting contains white also.  When highlighting tomato red, we do not have a lighter colour in the series 1 & 2 colours that does not contain white which is why orange was used. 

(NOTE: We stock a wide range of DecoArt Americana colours and you can purchase the DecoArt Matte medium and flat brushes separately if you didn't want to invest in a full Flat Brush Starter kit.) 

Add dots to the centre of your Poinsettia to complete the flower

Step 9: Next, I used the large end of the dotting tool and yellow ochre (from our Series 1 Starter kit) to dot in some large and small dots in the centre. Once dry I placed a smaller soft black dot in the centre of the larger dots. 

Add further highlights to the Poinsettia with another layer of DecoArt Americana acrylic in Cadmium orange

Step 10: Once I'd put the dots on, I felt it needed a bit more 'pow' on the highlights - so I side loaded the round brush with Cadmium orange (as taught in the Series 1 Vintage Rose lesson) and applied it along the edge of the top petals. I then used a toothbrush & soft black to splatter the finished design before adding to the greeting card.

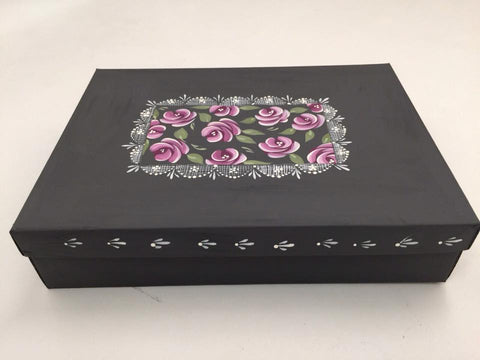
Once you've practiced your poinsettia, try painting it into a mount board square. If you are pleased with the result, you can add it to a greetings card, attach it to a gift bag or note book or use it as a gift tag and you have a little something that will mean just a little more than something you bought from the shop. 

Happy Folking,  

Carol xx 


SHARE:

Monday 30 November 2015

Tutorial: How to design a delicate lace pattern


Our Delicate Lace pattern is a fantastic design to add borders and edging to your project. Use it on its own or combine it with one of our other kits, it is so versatile and looks lovely wherever you paint it. Today, we will be teaching you how to get the most out of your kit and showing you how to design your own delicate lace patterns. 

The equipment you will need for this is...
  • tracing paper 
  • a marker pen 
  • a pencil and eraser 
  • light or dark transfer paper depending on your project 
  • different sized coins 
  • low tack masking tape
  • paints and paintbrushes of course!
Before you add your delicate lace, first basecoat your gift box in DecoArt's Chalky Finish paint in 'Relic', a gorgeous dark grey. (No primer needed)
DecoArt Americana paints needed: 
Carol used DecoArt's American acrylic in warm white from our Series 1 kits to paint the delicate lace .
The vintage roses (our Series 1 add on kit) were painted using DecoArt's Americana acrylic in: Plum (from our Series 2 Starter kit) and warm white.  The leaves were painted using Avocado from of Series 2 Starter kit. 
How to design your Delicate Lace:
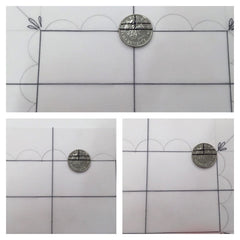
 Step 1: on your tracing paper, draw out the rectangle/square you wish to edge in a size you need. Then mark it into quarters.
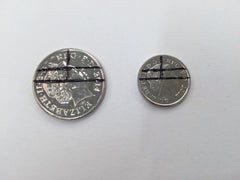
Use a marker pen to draw the square/rectangle so you can rub pencil marks out later - designing lace is a process of trial and error (as all the best things are!)
Step 2: make lines as shown here onto your chosen coins - you can choose whichever size you like but we like 10p and 5p coins :)
Step 3: using the lines you've drawn as a guide, start drawing your scallops. Begin in the centre and work outwards.
The scallops will either fit nicely or need spacing out slightly - this is where you will need your eraser.
INSPIRATION: before you paint your scallops, play with designs - try diagonal, horizontal and vertical lines. Edges can be finished with dots and comma strokes. You can also add dot hearts, dot roses or daisies into the scallops themselves! This is another excellent addition to a painting journal.


Step 4: before painting your lace design onto your object, use your transfer paper to draw your scallops out and mark off your rectangle.  Depending on the design you wish to paint in the centre, you might want to use low tack masking tape to mark it out.
Mask the area you wish to paint to give you a crisp shape.
Step 5: Add your lace design to frame your design.

When the low tack masking tape is removed, your design will look as though it has been cut out giving it a completely different look to a more structured design that would simply sit in the centre. Draw out your semi circles and fill them with your chosen lace design. 

Before you sit back and enjoy your creation, take a look to see if you have overlooked any details.  Why not add patterns to the rim of the lid to complete your project.
Use your completed box as an alternative to gift wrap or keep it for yourself.
All that is left to do now is enjoy your box. Whether you choose to use it an alternative to gift wrapping or keep it for yourself, it will be admired by anyone who sees it :) 
I hope you enjoy this tutorial and as always, we would love to see your designs on our Facebook page. If our Delicate Lace kit is not in your collection already, you can find it here.
Happy Folking, 
Carol x 
SHARE:

Monday 16 November 2015

Abandoning Art in 5 easy steps with You Can Folk It


We hear everywhere don't we that our lives are getting busier, more stressful and that we are forgetting how to slow down and enjoy the moment. In a world where we hear so much bad news, and where many are so quick to criticise others; positive images, news and stories are treasured, shared and enjoyed so much more. A while ago we shared this video from another Facebook page and it brightened our day and judging by the shares it received it brightened many others too. 


Seeing this video made us think.  For some, it may be dismissed as a silly, simple act but it has such a powerful effect. As we watched it again, we realised that it is something we would like to aspire to. Many of us are familiar with yarn bombing, where people will cover objects in crochet or knitting to spread a little cheer. The fun doesn't stop at wool though! Some of you may have heard of a movement called "Art Abandonment" - where artists all over the world create pieces of art for the purpose of leaving them in public places for others to find. From sketches to jewellery and sculpture, artists are making others smile through their kind gifts that are often accompanied by kind sentiments and words of encouragement.  

When we heard about it we immediately thought it was a great idea! As Folkers, we love creating but we may not always have a reason to create or a recipient for our projects. To create small items and leave them for others to find, not knowing who that may be, sounds like the perfect way to create a little happiness in ourselves and others. If you would like to get involved in this idea, we have created  some resources and a little how to for you. 


1. Get out your Folk It kits and start creating. Sometimes when we create for others, we put pressure on ourselves to be perfect. We think about what they would like or restrict ourselves to colour schemes to suit tastes or events like weddings.  The beauty of creating for the purpose of abandoning it is that you, the painter, can remain anonymous! Try ideas you have been thinking of, play with new techniques, the world is your oyster! 

2. Paint on anything you like; paper, jewellery, hanging hearts, whatever you wish. Mix it with sketching, stamping or any other technique that takes your fancy to create something beautiful. (This is also a great way to pass on the projects we create while we are practicing Folk Art painting).  

3. Select your location. According to Michael deMeng, founder of the Art Abandonment project some places are better than others. Most popular places for art abandoners are: cafes, bars, out in nature (weather permitting and of course, the project should not pose a threat to wildlife), hospitals and waiting rooms.  You can be as creative as you like and many artists leave them on windscreens, in lifts and on public transport to name a few.

4. Add a note for the recipient. This of course is optional but the exciting part of abandonment for many is to receive responses from the person who has found your piece of art.  We have set up an email address that is included on the note we have created (though of course you can always create your own personal note!) We created this email so that for you the abandoner, it is anonymous and we will be able to share the responses on our Facebook page for everyone to enjoy. 


5. Take a picture - if you want to share the project your are abandoning, feel free to take a picture and share it with us. We always love to see Folkers' projects and would love to hear where you are leaving it to be found. 

So there you have it, it really is that simple. We don't know about you but we are feeling excited at the thought that we will be leaving a little bit of art out and about in the future, not knowing who will find it and hearing about how they did stumble upon it. 

Just like the video, we hope that this will create a few more smiles around the world. It's always nice to create with a purpose and what better purpose than to leave a gift and make someone's day a little bit better! 

If you wish to become an abandoner, we have created the note and email to help but do not feel that you HAVE to use them. Feel free to create your own or choose not to leave a note/method of contact at all. The choice is yours.

If you wish to learn more about the original Art Abandonment project, you can read about it here


SHARE:

Tuesday 27 October 2015

Decorating Pumpkins the Folk It way


As we welcome in the signs of autumn, the golden leaves and colder weather, it also means that its nearly time for Halloween. For some, this event is the best day of the year and while we are some way behind the US for celebrating the holiday, it is certainly becoming a bigger deal in the UK as the years go by. 

As pumpkins fill the supermarkets, we could not resist the urge to take a few home to decorate.  We could have got out the knife but we were inspired by this recent blog post we saw and decided to follow the 'no carving' trend. 

If you want to have a go at decorating your own, here's what you will need: 

Paintbrush - we used a DecoArt 2" flat brush 
DecoArt Americana acrylic in warm white 
Paper towel 


First we painted the pumpkin in DecoArt Chalky Finish paint. As we keep saying, the beauty of this paint is that it needs no prep - grab your pumpkin and get painting. It gives a gorgeous matte finish which gives the perfect look for Halloween. 

We painted our pumpkin with DecoArt Chalky Finish paint in carbon
Paint one coat of Carbon onto the pumpkin.
Once this coat was dry, (you could speed it up with a hairdryer if you needed to) we dry brushed the pumpkin with DecoArt Metallic wax using long vertical strokes to follow the curves of the pumpkin. To do this, lightly press the brush into the wax and remove the excess by brushing it onto the paper towel. When the brush feels almost dry to the touch, lightly brush the wax over the pumpkin. If you wish to build the colour, add a second layer of the wax to the pumpkin. 

Dry brush the pumpkin with DecoArt metallic lustre
Create a thing of beauty using Metallic lustre!
Now comes the fun bit! Grab your round brush, your chosen colour paint and get Folking! The beauty of this project is that you can paint whatever design you want onto it.  The curved surface of the pumpkin presents its challenges when painting but you can make your design as simple or as intricate as you wish. The important part is to have fun with it. 

We chose to decorate ours with comma strokes, flowers (from our bluebirds kit) and dots. Let your imagination go wild!
Deco
Here is our beautiful Folked up pumpkin 
Now we've got the bug we are going to have fun carving one.... 

If you have created a Folk It pumpkin, or if we have inspired you to have a go at painting one up for Halloween, we would love to see it. 

Happy Folking...and Happy Halloween, 

Carol x
SHARE:

Saturday 17 October 2015

Five great ways to add writing to your Folk It projects


So you have painted up something you are proud of and you want to add writing as a finishing touch but what do you use? There are a number of options available and your choice may depend on the finished look you want and personal preference so here are a few of our favourites for you to choose from.

1. Transfers

Our Series 2 kits contain phrases and words for you to transfer onto your projects. For each project we have created tailor made transfers for each one.  We understand that not everyone likes their handwriting or you may want something a bit more formal to finish off your masterpiece and once you have got to grips with using the transfers you can create your own to add to those projects and to ones from Series 1 if you wish.

Use DecoArt Matte medium to transfer writing to your project in our Folk It Series 2 kits
Transfers make it easy to add phrases and words to projects. 
2. Painting

Trust us, if you practice enough, you can learn to use your liner brush well enough to write with it. It's true, it takes commitment and yes, there may be times when you want to throw the brush and your paints through the window and wish to never see them again.  However, trust us when we say it is so worth it when you paint with a flow that wasn't there before. Give your work a finished look by adding dots of paint at the ends of your lines.

Use a liner brush to write onto your Folk It projects
It is possible to use a liner brush to write onto your project 

Another option is to draw letters onto your work and fill them in with paint. This is quite difficult on smaller projects but possible on larger ones.  We have pinned a great tutorial showing you how to do this here.

Draw on letters and fill with paint
Draw and paint on letters to your project 

3. Permanent markers

These are a great option for writing onto your project and like paint, using different colours can give you a different look. There are a few things to remember when using these though...

You have to leave your project to dry. Yes, it seems like an obvious thing to say but we've all been there; we are excited, we think the paint is dry or we hope we can get away with it, or most irritating of all, 99% of it is dry and just as we are finishing off our masterpiece, the paint catches and you can't hide it. If in doubt, leave it for an extra couple of hours. When you are writing with the permanent marker, you will find it does clog up. You're paint is dry so why is this happening? The reason is that your paint will still pick up a bit of 'transfer' that clogs up the end of the pen. Don't worry, all you need to do is keep wiping the tip of your pen with a piece of tissue.

It is easy to write directly onto your Folk it project with a permanent marker
Add writing with a permanent marker - play with colour and nib widths.

4. Uni Posca Paint pens

Available in a range of sizes (the tips range from extra thick to ultra fine) and colours (including metallic) these pens can be used on a wide range of surfaces. If you have seen some of our previous tutorials, you will have seen that Carol is a fan of these and has used them to personalise table decorations recently for her sons wedding.  These are a great alternative to using a liner brush, especially on curved and uneven surfaces.  If you would like more information, you can find it here.

Carol used Posca paint pens to personalise these wedding table decorations
Carol used Posca pens to personalise table decorations
5.  Stamps and stickers

Although this is not a medium we use at Folk It, we know a lot of our Folkers, being a crafty lot, have other resources available to them.  Providing beautiful, uniform writing, stamps and stickers are a fantastic option and our many people often use these to add sentiments and writing to their project. With many great designs available, there is one for any project. Whether stamped directly onto the project or onto card and added as an embellishment, it can be the finishing touch to your work.

Add stamps to your Folk It project to add detail
Stamp directly onto your project or, create a little embellishment as one of our Folkers has done here. 

So there you have our top five ways to add writing.  These are by no means the only options available  but these are the ones we use and see most often.  If you use a different method, we would love to hear about it.


Happy Folking,

The Folk It team x
SHARE:

Thursday 8 October 2015

How to create beautiful storage by painting on glass


For many people discovering a new hobby can be exciting and addictive. Once we delve into learning a new skill, our confidence grows and soon, all we want to do is create. It is often the same with our Folk It kits. When I discovered Folk Art in Australia, I would drop my children off at school and take up residence in my teachers studio to take part in back to back lessons, only leaving when I needed to pick them back up again. There comes a time when paper is not enough and we want to use our brushstrokes on anything that doesn't move. We know that we are not alone in this feeling and a while back I created this tutorial for our newsletter subscribers. Following the Handmade Fair and our weekender on Create and Craft recently, we have started receiving questions about how to paint on glass. We visited our newsletter archives, gave it a tweak or three and posted it here for you to enjoy. I hope you find it useful. 

Happy Folking, 
Carol x 

DecoArt understand the lure of painting on glass - to create beautiful glass tree ornaments, upcycle jam jars or create beautiful storage. They have done a fantastic job creating many different paints that allow you to paint straight onto different surfaces. If you wish to paint on glass, you can choose some lovely DecoArt Gloss Enamels. However, DecoArt Multi Surface Satin is a great all rounder for painting onto most surfaces. 


However, the best paint for Folk Artists like us, is Americana Acrylics. They are a perfect consistency and dry to a beautiful matt finish. The problem with using these paints on their own and painting directly onto glass is that they can be very easily scratched off. However, the solution can be found in DecoArt's Paint Adhesion Medium or Multi Purpose Sealer.  
You can either paint a thin layer of the medium directly onto surface you wish to paint as we have done here, or you can add it into your acrylics (1:1 - you will not lose quality in colour or consistency) and paint directly on to the plain glass. 


So lets get started...  
Use used jars and canisters, Folk It and DecoArt's Paint adhesion medium to epicycle them.
Any old jar...
Step 1: Choose your glass item you wish to paint. I chose an empty pickle jar - it doesn't have to cost a fortune to look pretty. This was a jar I had at home but I chose it for its lovely shape and detail - any raised detail will look lovely when you lightly sand some of the paint off.
Before you start to paint you need to ensure the surface is absolutely clean. While it is tempting to miss this step out, (especially if you're excited to get started) it really does ensure the best finish. Use a 1:1 solution of vinegar and water to wipe down your glass. We have a lot of natural oils on our fingers that can ruin our finished piece so be careful not to handle the glass after you have cleaned it. 
The ultimate grease remover is pure alcohol called Isopropyl. It is worth investing in some if you wish to paint a lot of glass and can be bought from Pharmacies. 

Step 2: Paint a layer of Paint Adhesion Medium onto your glass and allow it to dry completely.  
(Please note: The Paint Adhesion medium has since been discontinued.  However, DecoArt Multi Purpose sealer can be used in exactly the same way for the same purpose) 
Step 3: Paint one layer of your paint on top of the dried medium. For this project, I created this soft green by mixing Baby Blue and Hauser Light Green (both from the Series 1 Starter kit). Again, allow your paint to dry completely before the next step.

Paint a layer of DecoArt's Paint Adhesion medium before painting it with your chosen colour.

I am a big advocate for using leftover paint. DecoArt's Americana acrylics really do go a long way and so here, I also covered a Kenco Millicano coffee tub (shown in the background). 

Step 4: (optional) With fine sandpaper, lightly rub over the jar to pick out any detail - like the words on these jars. 
Step 5: Using your traced pattern and transfer paper, transfer your design guide onto your surface - don't forget all sides and any lids you may have!
Decorate with a Folk It design - here we used our Vintage Rose kit available from www.folkit.co
Paint on your design 
Step 6: Paint your design onto the dry base colour. These roses were painted using a mix of Baby Blue and Tomato Red from the Series 1 Starter Kit. 
Step 7: Sit back, admire and wait for your paint to cure. 

Painted jar created using Folk It's Vintage rose kit
Leave to cure! 
Things to remember.....
All paint needs to cure. A cured paint will be solid throughout, not just dry to the touch. Acrylics often feel dry a few minutes after being painted but in order to cure, it usually needs a couple of weeks. Factors such as humidity, number of coats and thickness of paint will also influence this time. A slick surface will mean paint is easily scratched off after a couple of days but becomes more robust after a couple of weeks.
Always remember, your painted objects are like a car. Scratch a car with a key and paint will come away. Similarly, if your object is scratched with some force, because it does not have that 'key', some paint will be removed, regardless of the paint used.  


SHARE:

Monday 28 September 2015

Beautiful and easy dot inspired makeover


Makeover tutorial

Moving house can be exciting and stressful in equal measure. For some of us, it means moving into the house of our dreams where every room matches our tastes. For some of us, we know our home is going to be a work in progress and there are many projects that are on our 'to-do' list. 

One of the best parts of moving home is inheriting items that you wouldn't have thought of buying before but there are also items that needs a bit of TLC.  Our most recent project was one of these items. One of our friends was discussing her new home the other day and mentioning how they didn't have the cash to update the dated decor. One of her solutions for now was to check out the sales and buy new accessories - much needed towels, toothbrush holders and mats.  When we saw this cute little shelf that she wanted to throw out, we had to step in and rescue it. When we saw it we thought it would be the perfect project for a dotty design - something a bit different from what we've created before. As we have recently celebrated International Dot Day and have seen how versatile the humble dot is we thought we would use them here.
Here we've put together a quick guide to how we transformed it.  


You will need:

Small storage item of your choice

Folk It Starter kit Dotting tool
Heart template from our Series 1 Starter kit
Folk It No 3 Round brush (from our Starter kit)
DecoArt Chalky Finish paint - we used Relic and Treasure
to co-ordinate with accessories.
DecoArt Americana Acrylics - we used Baby Blue, Warm White and Lamp Black from the Starter Kit.
Roller brush
Flat brush for painting the corners
Fine sandpaper
Vaseline for distressing (optional) 


up-cycling, tutorial, shelves, shelf
The original shelf - complete with dated decoration

We have said it before but the beauty of DecoArt's Chalky Finish paint is that you do not need to sand or prep your project before you begin. As the shelf had been sat in an empty house for a while, we did give it a wipe down with a damp cloth to remove dust and grime. Once it dries, if you would like to distress your shelf, add a layer of vaseline to areas where you don't want the paint to stick. We began painting the shelf with the Chalky Finish paint in Relic, using an old flat brush to reach the awkward corners on the inside. Allow to dry.


Paint a second coat and allow it to dry, if you have applied Vaseline, using a dry cloth, now rub the areas where you have applied it to remove the paint.  Next, we transferred the template onto the shelf by placing the template in the area we wanted the design, placing the transfer paper chalk side down underneath the pattern and tracing over it with the small end of our dotting tool. We chose to add a heart on the top and sides of the shelf.


Next, using the old flat brush, we added one coat of Americana Decor Chalky Finish in Treasure to the edges of the shelf. Once it had dried, using the sandpaper from our Starter Kit, we rubbed areas of the shelf (including the small handle at the bottom) to allow the Relic grey through. (Again, if you used Vaseline on these areas, you would simply rub off the paint instead with a dry cloth). In some areas, we kept sanding to reveal small patches of the original colour through too.


Decoart, paint, shelf, up-cycle, re-paint, basecoat
The new shelf is now ready to decorate :)

Now comes the fun part! Using our template as a guide and working our way inwards from the edge we started dotting. We mixed our dark blue with baby blue and black and started with that but as we worked around the heart we kept adding white to lighten the colour. This meant that it created a lovely Ombre effect on the design with the lightest dots being in the middle.  To fill the heart we used a mixture of small and large dots using the tool. Once we had completed the hearts on the top of the project, we used exactly the same process for the hearts on the side.


We filled the heart with dots, using a dotting tool. A great project for up-cycling/furniture makeover. Add white as you go for an ombre effect
Filling in the heart was rather therapeutic and we were pleased with the overall effect. 
To finish the project, we added small comma strokes below the hearts to add a bit more detail but these are optional. You could add whatever extra details you wish. As we are always telling our Folkers to remember the little details, we painted a small heart on the little handle at the bottom and added dots around it.


Added detail from comma strokes for the dot filled heart
Adding detail to the completed hearts
Finally, the little shelf was unrecognisable and the Relic and Treasure really compliment each other. Thankfully, our friend is over the moon with it and is so happy she didn't throw it away.  The great thing about this project is that anyone can do it whether they Folk It or not. All you need is a bit of paint, patience and a dotting tool.

Makeover completed. A dot heart project anyone can complete
Our completed shelf. 


SHARE:

Tuesday 22 September 2015

Folk It spent their 1st birthday at The Handmade Fair

Well, the dust is settling and we have been busily unpacking after the Handmade Fair.  As we settle back into our usual routine back in Sheffield we are still bowled over, not only by the fantastic response we received over the weekend but also by the event as a whole; the quality of the stalls, the food and of course, the atmosphere. Only in it's second year, it is still relatively new but it can certainly stand up against the more established events across the country. 


As you may know, the team at Folk It were preparing for the Handmade Fair for quite a while before the show.  This event certainly had a special place in our heart as it was the event we used to launch our kits back in 2014. Last year we had a fantastic response and this year although we hoped for a successful weekend we weren't sure what reaction we would receive, whether we would see many people from last year or how many new faces we would see.  We are pleased to say however, that our fears were unfounded. Throughout the three days the Folk It team was kept busy with demonstrations, questions and catching up with Folk It regulars from our Social media and a few familiar faces. Among those we met were the lovely Carrie from illabella, blogger and crafter, Terri from Home is where the craft is and Susie from SK Cakes

It was fantastic to chat to Folkers about the projects they've created since last year and it was a great feeling to see projects posted on Social media from people who had gone straight home or to their hotel and cracked open their kits.

1. Emma created this lovely hanging heart. 2. Lauren went home to practice the Starter kit designs.
3. Louisa has been bitten by the Folk It! bug and has been adding dot designs to everything :)
4. @thecrochetchain shared these lovely borders on Instagram

Every evening, you could find Carol in the Grand Makes tent putting her teaching experience to excellent use to show everyone how to create a dot rose design. Many people entered the tent very sceptical about how easy this design is to create and to see their designs and their faces when they realised we were telling the truth was amazing.  From old to young, men and women, they all left the tent with a huge sense of achievement and a card to keep.  We had to dash back to the tent each day to help out the rest of the team with the crowds of people buying kits afterwards. Word got round to the organisers as well and they congratulated Carol on delivering one of the best Grand Makes of the event.  


One of the lovely surprises of the weekend has to have been a visit from Kirstie Allsopp to our stall. Early Sunday morning, Carol found herself demonstrating the Starter kit to Kirstie who was amazed at how simple and effective it was.  Knowing how busy she was, it was lovely to see her stop by and celebrate our first birthday with us with a team photo :) 

The Handmade Fair Folk It team with Kirstie Allsopp 

One of the downsides to the event was that we did not get a lot of time to browse the amazing stalls and wares that were on offer (though that might have been a good thing for our bank balances!). As a Sheffield based company ourselves, it was lovely to see people from Ernest Wright selling their fantastic scissors in the other tent.   We were also introduced to the fun and wonderful world of Wild Things who create beautiful dresses and capes for little ones.  From beautiful dresses to Little Red Riding Hood capes and fancy dress outfits this stall was just gorgeous! One stall that also seemed to be constantly busy was the Arty Crafty Place and their Block Craft. Their Fair-trade hand carved blocks can be used to print on paper and fabric and their range of designs was stunning.  

Simply Vintage Designs had a beautiful stall and the Haywood Sisters were part of the HotchPotch Charity Events tea rooms. 

There was lots of cake decorating inspiration on the Fiona Cairns stall and the staff at Lea Lu were dressed in beautiful vintage outfits. 

With a relaxed, almost festival like vibe, we saw an array of outfits from vintage to crochet, sophisticated to unusual.  With Pom Pom jewellery and flower headband workshops there was an array of eye-catching head wear.  There really was something for everyone.  

Kirsty and One Man Crochet certainly turned a few heads at the weekend  
It is impossible to say which part of the event was our favourite as we have truly been blown away; by the amazing stalls we have seen, the people we have met and the feedback we have been given. One thing we are certain about though, it was a fantastic place to celebrate our first birthday.  With many exciting events on the horizon, we are definitely looking forward to The Handmade Christmas Fair in November.  If you can get to Manchester, it promises to be another fantastic (and festive) weekend.  


SHARE:
© You Can Folk It!. All rights reserved.
designed by pipdig